Frosthaven Meteor Class Overview (Spoilers)
Spoilers for the unlockable Meteor class from Frosthaven follow. You have been warned.

The Pyroclast is a control and damage dealing class. Their core concept is set up around creating hazardous terrain and obstacles which many of their other abilities can combo off of. They even come with their own lava tokens so you can track the hazardous terrain that you create.
They also have several cards that offer powerful abilities with the trade-off of placing an ongoing negative condition on you. These are tracked on the cards themselves, and can only be removed by resting.
A couple of notes on the class and my own personal experience before we jump into the cards.
First of all, the Pyroclast is the second class I’ve played in Frosthaven, so far. My starting class was the Boneshaper, and you can ready my thoughts and a class guide for that class right here. Our party composition has changed a few times since I unlocked this class. So far I’ve played them in both a three and four person party with, Snowflake, Coral, Shackles and the Drifter.
As should be obvious from reading the class description, this class is highly dependent on having a reliable supply of hazardous terrain or obstacles nearby. Your abilities can trigger off of any of these that come setup as part of the scenario. But that’s going to be highly variable from one scenario to another. Fortunately, you have several card abilities that let you create either hazardous terrain, obstacles or both. So in most cases you’re going to want to prioritize those cards. Eventually, you’ll unlock some perks that let you add cards to your modifier deck that create hazardous terrain, and those are extremely helpful. But until you have those, keeping cards that let you create what you need will be a priority.
While we’re speaking about perks, there is one key passive perk that I suggest you gun for as quickly as possible. The perk, “You and all allies are unaffected by hazardous terrain you create.”
It will be at the bottom of your perks list and it costs a total of three perk points to unlock. So it’s a heavy investment. But, in my opinion, it’s worth it. Once you can start throwing around hazardous terrain without having to worry about hurting yourself or your party members, the class becomes exponentially more powerful and fun to play.
One final note, there are essentially two paths you can take with the Pyroclast. You’ll either want to focus on cards that both generate and trigger off of obstacles or cards that both generate and trigger off of hazardous terrain. For the purposes of this guide, we’ll call these Rock Pyroclast and Lava Pyroclast.
With that out of the way, let’s dive into the cards.
Level 1 Cards

Cloud of Ash is going to be most useful for a Rock Pyroclast. But it’s versatile enough that a Lava Pyroclast may find it work keeping as well.
It’s a relatively speedy card with an initiative of 23.
The top half lets you explode an obstacle tile at range 4 and deal a 1 damage attack to all adjacent enemies. Importantly, this is an actual attack. Not flat damage. So you actually draw a card from your modifier deck for each enemy hit. Then you get to push those enemies away from the blast zone by one space each and muddle them.
Finally, you’ll generate a leaf and gain one xp.
An extremely useful top half, as long as you have a ready supply of obstacles. I’m playing as a Lava Pyroclast. But I would often take this card with me into a scenario if I saw it was going to have lots of obstacles in it.
Not great against shielded enemies, since you’re actually drawing attack modifiers. But against unshielded enemies it’s great. As you can end up doing a lot more than the base damage of 1.
The bottom half is a pretty useful movement of three. With the option to replace 1 or 2 hazardous terrain tiles with obstacles. Again, this is a great combo for a Rock Pyroclast. But it’s doubly useful, in that you can use this to block enemies off and control their movement.

Cooling is a must-have card at early levels.
It will probably have some more legs for a Rock Pyroclast, thanks to the top half which lets you replace a hazardous terrain tile at range 4 with an obstacle. All adjacent enemies suffer two damage, you generate a leaf and gain an xp.
This has obvious synergies with something like our first card, Cloud of Ash. Plus it’s a great option for dealing with shielded enemies. Because, unlike Cloud of Ash, this is direct damage. Not an attack. So it will ignore shields.
This is a slow card with an initiative of 75. But that can actually come in handy, especially for the bottom half.
The bottom half of the card is your only real healing option when you start out. It’s a nice one, though, with a self heal of 5. It comes with a trade-off, though. In the form of another key mechanic for the Pyroclast. De-buffs, essentially.
Once you perform the heal, the card remains active and you must place a counter on it. Your next three move abilities will have -1 movement. You can’t voluntarily discard these cards either. The way you can with most other classes that have positive buffs.
But, again, it’s your best and only heal to start with. So, for that reason alone, it’s worth taking this card.

The initiative on Eruption isn’t great, with a very middle-of-the road 47. Meaning it can sometimes be hard to get this in the order where you want it.
The top half of the card is a great resource builder though. Regardless of which type of Pyroclast build you’re going for.
You create an obstacle in an empty hex at a ridiculous range of 5. Then you create hazardous terrain in any occupied hexes around that obstacle and cause anyone occupying those hexes to immediately suffer 4 damage. Again, this is direct damage. So great for chewing through shielded enemies.
You do have to be careful with this one, though. As it will also damage any party members who happen to be in one of those occupied hexes.
Finally, you generate fire and leaf, earn 2 xp and lose the card.
Yes. It’s a burner. So you don’t want to pick the time to deploy this carefully. But having a reliable way to generate hazardous terrain and obstacles on-demand is clutch.
The bottom half is a standard attack of 2 that also generates fire. Nothing special to see here. Move along.
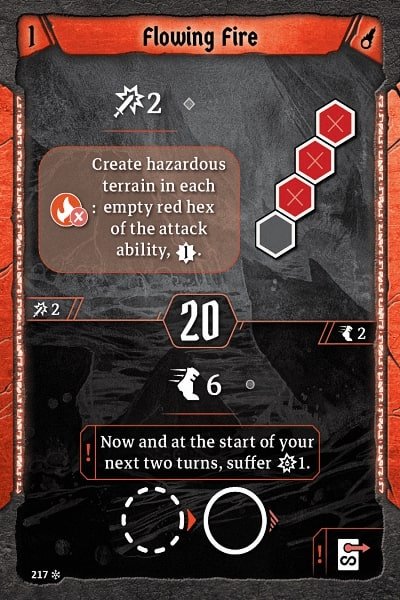
Ah, Flowing Fire. Our next must-have card.
A nice and speedy initiative of 20 means you’ll be going before most enemies.
The top half is a very solid attack of 2 on three different hexes in a straight line from your character. But things get really interesting if you have a fire element you can consume. At that point, you get to place hazardous terrain in each empty hex targeted by the ability.
In fact, you actually consume the fire after the attack is performed. So if you kill the target or draw a push card from your modifier deck and the target is gone when the attack ends, you can get 3 total hazards out with this bad boy.
And if the top half weren’t enough to convince you to take this card, the bottom half should be. An astounding move of 6! That’s right. 6 total movement. The draw back being that you’re going to suffer 1 damage now and at the start of your next two turns. That’s a price I’m usually willing to pay for that much movement.
This is probably one of the most-used cards in my deck. Take it.
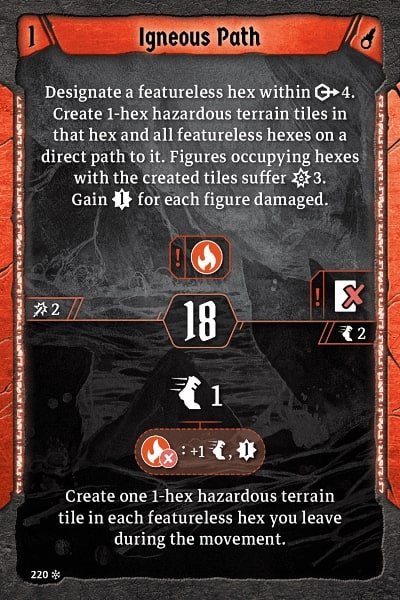
At 18, Igneous Path is your fastest level 1 card (not counting X cards).
The top half is another loss. But it’s also another great resource generator. In fact, I would argue that this card is key if you’re going for a Lava Payroclast build. It lets you designate a hex at range 4 and fill that hex and all hexes on a direct path to it with hazardous terrain. Anyone occupying one of those hexes will also suffer 3 damage. You’ll gain 1 xp for each figure that you damaged and generate fire.
Again, you have to be careful with this one. Because you can hurt other party members. Plus it’s a burner. But I use this card frequently, once my party gets to the final room in a scenario. It’s a great way to quickly fill a room with hazardous terrain.
The bottom half of this card may seem underwhelming at first. A measly move for one. But you can consume fire to add another movement. Plus, you get to leave a trail of hazardous terrain behind you when you move. This ability synergizes nicely with anything that gives you bonus movement. Including some other character abilities. I’m looking at you Snowflake. With enough bonus movement, you can literally leave a trail of destruction.
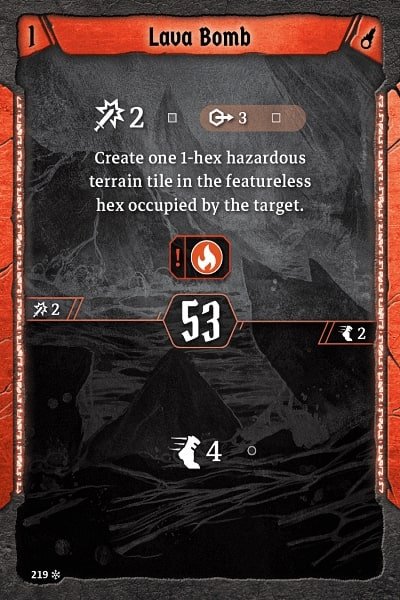
Well, I called them a Lava Pyroclast for a reason. If you’re going down that path, this card is your meat and potatoes. It’s not very exciting. But it’s reliable and does what you need it to, when you need it.
Much like the rest of the card, the initiative is pretty uninspiring at 53.
The top half is a pretty straightforward attack of two at range 3. But you also get to place hazardous terrain underneath the target of the attack. Finally, you generate fire.
Again, not a super impressive attack and you only get to place one hazardous terrain tile. But, it’s a reliable way to get hazardous terrain our without consuming an element or burning a card.
The bottom half is a good movement of 4. Even if that doesn’t seem very exciting now that we’ve seen our move 6 card.
Again, everything on this card is just good. Not great. But good. I still suggest you take it.
In many ways, I think it’s under-appreciated. It’s putting in good, regular work. While other, flashier cards get all the attention. Poor Lava Bomb.
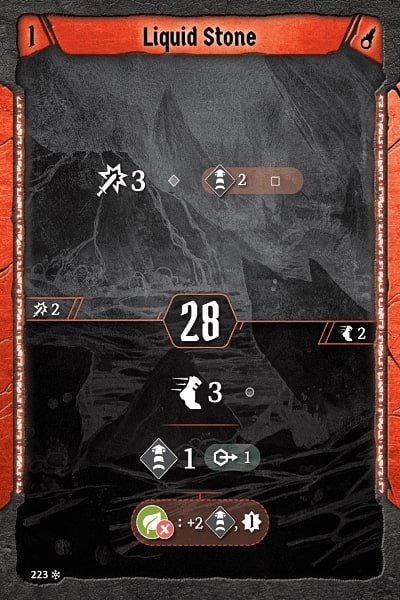
What’s a useful ability for a character that generates a lot of hazardous terrain? How about a push?
A reasonably fast initiative of 28.
The top half of Liquid Stone is an attack of 3 with a push. Attack of 3 is already solid. But if you can push the enemy through some hazardous terrain while your at it…
The bottom half is a respectable move 3. But you also get to push an enemy that’s adjacent to the hex you stop in for 1. Again, great for repositioning or getting some extra damage from pushing them into hazardous terrain.
Additionally, you can consume a leaf to increase your push distance by two and gain an xp.
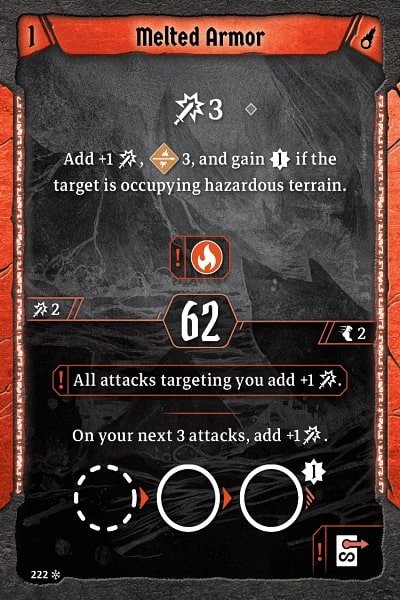
Melted Armor is one of our slow cards with an initiative of 62. But it packs a punch.
The top half is an attack of 3. But we get to add 1 damage, a pierce of 3 and gain 1 xp if the target is occupying hazardous terrain. Now we’re starting to get those combos. We’re also starting to get an appreciation for all of the different ways this class has of dealing with shielded enemies.
Finally, you generate a fire.
The bottom half is a strange one.
At first glance, it doesn’t seem very useful. You get to add +1 damage to your next three attacks. But as long as the card is active, you’re also going to take +1 damage from every attack targeting you. This seems like an especially crappy de-buff to have out. The key here is to not let it stay out. Instead you want to use this ability when you have an attack lined up that’s going to hit multiple enemies or trigger multiple times. That way, you trigger all of the bonuses and discard the card before any enemies have a chance to hit you.
Pairs nicely with Flowing Fire, or any AoE attack.

Fast but not too fast at initiative 30, if you needed more of a hint that you should be pushing and pulling enemies, here it is.
The top half of the card is a push of 3. That’s it. No attack. Just a push of 3.
However, if you have a leaf to consume, this gets extra spicy. You get to double the damage of any hazardous terrain you just pushed an enemy through. Then, you replace any hazardous terrain tiles an enemy moved through with obstacles.
This makes the top half great for Lava Pyroclasts. Because it doubles the damage of hazardous terrain. And great for Stone Pyroclasts. Because it creates a bunch of obstacles.
It’s highly dependent on a leaf element. But you have lots of ways of generating those. Like the bottom half of this card.
The bottom half is a bit like the bottom half of Melted Armor. You’re going to deal -1 damage on your next three attacks. But then you get to double the damage of the fourth attack, and gain an xp.
Again, this pairs nicely with an AoE attack. Brun through the negatives with several small attacks. Then save up for one really big whollop on a boss or elite enemy.
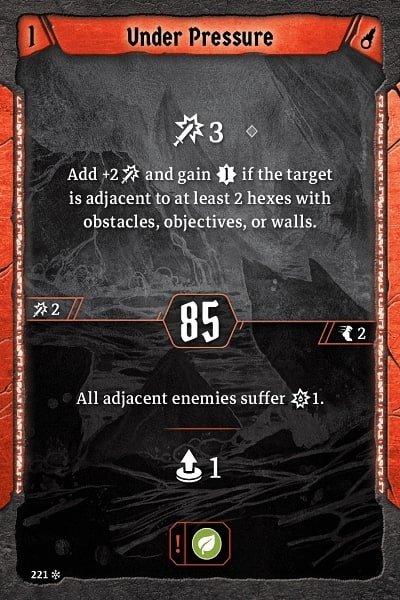
Your slowest card with an initiative of 85.
The top half of Under Pressure is a must-have card for a Rock Pyroclast. A 3 damage attack. But you get to add +2 damage and gain an xp if the target is adjacent to at least 2 obstacles, walls or objectives.
The bottom half is a must-have card for any Pyroclast. Because it’s your loot card. The nice thing here is that, in addition to your loot action, all adjacent enemies will also suffer a damage. And you generate a leaf.
Now let’s take a look at our level X cards.
Level X Cards

Remember when I said that Igneous Path was your fastest level 1 card. Technically true. Because I wasn’t counting this. This is actually your fastest card, with an initiative of 15. So it’s a tempting option for that speed, alone.
You’ve had lots of push cards up to this point. But the top half of Force of the Earth is your first Pull card. An attack of 1 at range 3 with a pull for 2 and a muddle.
Let’s talk about masteries for a second. You may have noticed that one of the Pyroclast masteries requires you to move an enemy through 6 hazardous terrain tiles in one turn. Seems impossible right? Well that’s because the only way you’re ever gong to pull that off is by combining multiple push AND pull abilities in a single turn. Eventually you’ll unlock some modifier deck cards that add a push to an attack. Combine those with a pull attack and you start to see you might be able to do this.
Outside of the Pull, there’s not much to remark on for the top half of this card.
The bottom half is very appealing for a Rock Pyroclast.
Destroy an adjacent obstacle and the next two heals targeting you get +1. You might be starting to see that if you want to be a little more in-your-face and tanky, Rock Pyroclast is the way to go.
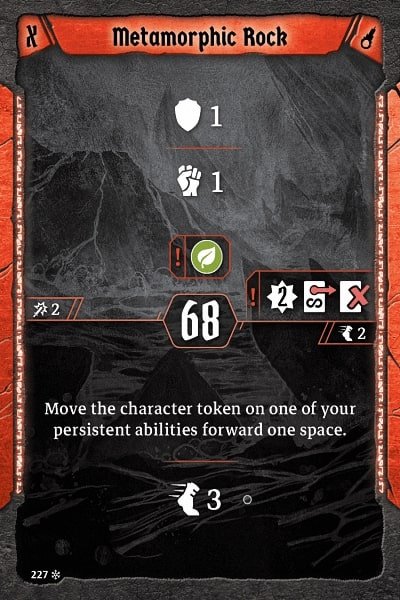
A slower card at 68, Metamorphic Rock is another great choice for Rock Pyroclasts.
The top half gives you a straight shield and retaliate of 1 each and generates a leaf. It’s a burner. But it’s also a persistent buff. Meaning, once you get this up, you’ve got 1 shield and retaliate until the scenario ends or you intentionally toss the card. Plus, you get 2 xp for your trouble.
Again, a great bonus if you intend to be on the front lines.
The bottom half gives you the one and only way you have to more quickly get rid of those pesky de-buffs. You get to move the token on one of your persistent abilities forward. And since most of your persistent abilities are bad, this is a nice treat.
Plus, you get a decent move of 3.
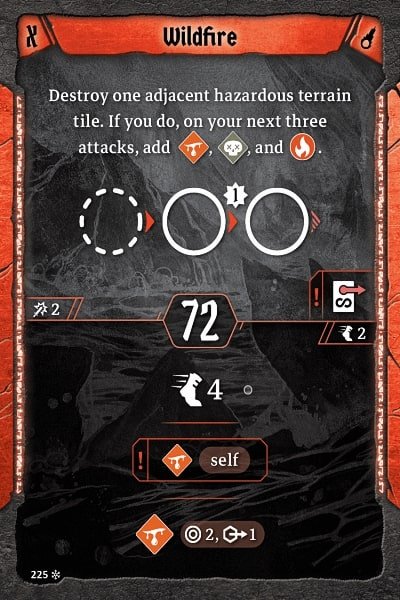
Wildfire is the most quintessential X card of the bunch.
It’s very slow at initiative 72. And it’s extremely situational.
The top half lets you destroy an adjacent hazardous terrain tile to add bleed, poison and generate a fire element on your next three attacks.
Not bad, if you’re generating enough hazardous terrain to feel like you can burn one. Plus, the usefulness of bleed and poison will be highly scenario dependent.
The same could be set for the bottom half.
A move of 4 is decent.
But you’re also going to place a wound on yourself and two adjacent enemies wherever you stop.
Again, situationally useful. But there are probably better cards you could take.
So let’s look at the starting hands for our two builds.
Lava Pyroclast
As a Lava Pyroclast, you’re going to take most of your level 1 cards. With the exception of Cloud of Ash. Instead, you’ll take Metamorphic rock. Which will be more useful to you in most situations. Especially for the de-buff mitigation on the bottom half. Unless you’re heading into a scenario with a ton of obstacles. Then you might want to consider swapping those two out.
· Cooling
· Eruption
· Flowing Fire
· Igneous Path
· Lava Bomb
· Liquid Stone
· Melted Armor
· Quenched Rage
· Under Pressure
· Metamorphic Rock
Rock Pyroclast
As a Rock Pyroclast you’re going to take most of your level 1 cards to start. Except for Lava Bomb and Melted Armor. Those two are more useful for the Lava Pyroclast. Instead you’ll take Metamorphic Rock both for the shield and retaliate, and the ability to mitigate some of your debuffs. You’ll also take Force of the Earth for the extra healing from destroyed obstacles. Both of these cards should compliment a tankier playstyle.
· Cloud of Ash
· Cooling
· Eruption
· Flowing Fire
· Igneous Path
· Liquid Stone
· Quenched Rage
· Under Pressure
· Force of the Earth
· Metamorphic Rock
Next, I’ll be adding a leveling guide to this post. To help you decide what cards to take at levels 2 – 9. So stay tuned for that. Until then, I hope this has been helpful.