Frosthaven Meteor Class Leveling Guide (Spoilers)
Spoilers for the unlockable Meteor class from Frosthaven follow. You have been warned.

First of all, if you’re reading this, you should have already read my Class Overview for the Pyroclast. If you haven’t I’ll refer you to it here. That guide walked you through the basics of the class and its starting cards.
In this guide, we’re going to take a look at what you have access to on each of your level-ups.
A quick note first. I’m going to mention which cards I reccomend you replace for each level. But, of course, you don’t actually lose access to those cards. You can always adjust your hand between scenarios. And you always have access to all of your level 1 cards. So these are reccomendations for the best general hand. But please adjust to suit your needs.
Level 2

Our first level 2 card comes in with an initiative of 38.
The gives you a standard attack of 3. But it gets much juicier if you are occupying hazardous terrain. You get to add 1 damage and 2 push to your attack. Plus you get an xp AND you get to heal for 2.
The bottom half is a self heal of 3. Plus you get to double your next attack targeting an enemy occupying a hazardous terrain tile.
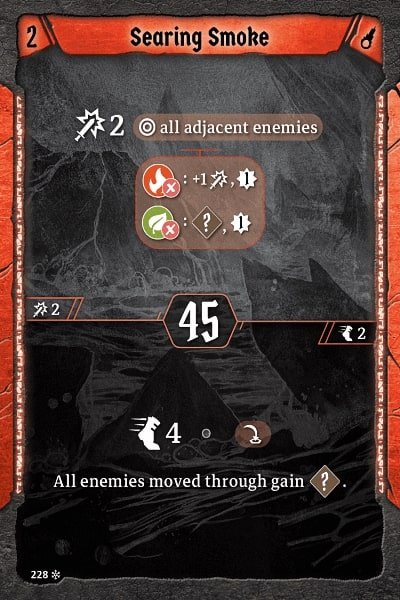
Our other level 2 has a fairly middling initiative of 45.
The top half gives you an attack of 2 on all adjacent enemies. You can consume fire to add 1 damage and gain an xp. You can also consume a leaf to add muddle and gain an xp.
The bottom half is a movement of 4 with a jump. Which is nice. But even better, you get to muddle any enemies you jump over during the movement.
Lava Pyroclasts should absolutely take Deep Fury. It combos nicely with all the hazardous terrain you’re generating. Plus, it gives you access to another healing option that doesn’t come with a de-buff attached.
To take it, we’re going to give up Eruption. Both Eruption and Igneous Path are loss cards that have the potential to get lots of hazardous terrain out on the board at once. But Igneous Path is much more reliable, and much faster.
Rock Pyroclasts will want to take Searing Smoke. You’re going to be on the front lines more often. So you’ll have a better chance of being surrounded by enough enemies to make the top half of the card useful. And the bottom half, with it’s move plus muddle can save your bacon when you’re constantly in danger of taking hits.
To take it, we’re going to give up Igneous Path. Again, you really only need one big loss card that lets you generate terrain. And since Eruption gives us an obstacle along with its hazardous terrain, it’s more useful for this build.
Level 3
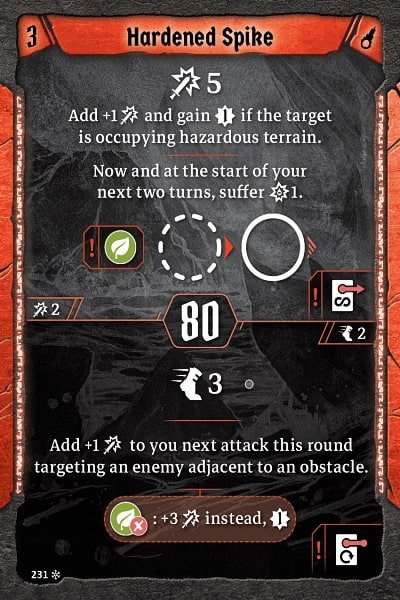
Our first level 3 card is slow but powerful with an initiative of 80.
The top half gives you a massive attack of 5. Plus you get to add 1 damage and gain an xp if the target is occupying hazardous terrain.
Finally, you’ll generate a leaf and suffer 1 damage now and over the course of the next two turns.
The bottom half gives you a move of three, and you get to add +1 damage to your next attack targeting an enemy adjacent to an obstacle. If you consume a leaf, you get to add +3 damage instead and gain an xp. Making this, potentially, another huge hit.

Living Magma comes in with a nice and speedy initiative of 22.
The top half is an extremely useful buff. Now and at the start of your next two turns, you get to perform an attack of 1 against and enemy adjacent to hazardous terrain. If you perform the attack, it also gets 2 pierce and a wound and generates a fire.
The bottom half is a pretty uninspiring move of 1. But it lets you reposition an adjacent hazardous terrain tile an deal damage to an enemy if you move it under them. The damage is a nice cherry on top. But the real utility here is the ability to reposition your hazardous terrain tiles and set yourself up for a combo.
Lava Pyroclasts should take Living Magma. The top half is, again, very useful for a character that’s generating a lot of hazardous terrain. An attack of 1 isn’t all that impressive. Until you consider that this is essentially a free, extra attack with a pierce and a wound for the next two turns.
It takes some setting up to make sure both you and the enemy are in the right positions. But hey, the bottom half of this card can help with exactly that. As already stated, it’s great for letting you reposition your terrain, and like similar powers, it pairs nicely with anything that increases your movement.
To take this, we’re going to give up Cooling. We don’t need to generate obstacles and we have better healing options thanks to Deep Fury.
Rock Pyroclasts will want to take Hardened Spike. You’ll get access to two potentially massive hits, one of which specifically combos off of obstacles. Plus, it’s a bottom attack which is a great and rare option to have. Add to that, the fact that the top half is a powerful hit even if you can’t set up the hazardous terrain combo. It only adds 1 extra damage.
We’re going to give up Liquid Stone. We have other ways of pushing enemies around.
Level 4

Hand of Flame is decently speedy at 29 initiative.
The top have is a really nice attack of 4 with a muddle. And it’s a terrain generator. Letting you place hazardous terrain beneath your target.
It also generates a fire.
The bottom half is a much more standard attack of 2 with a wound.
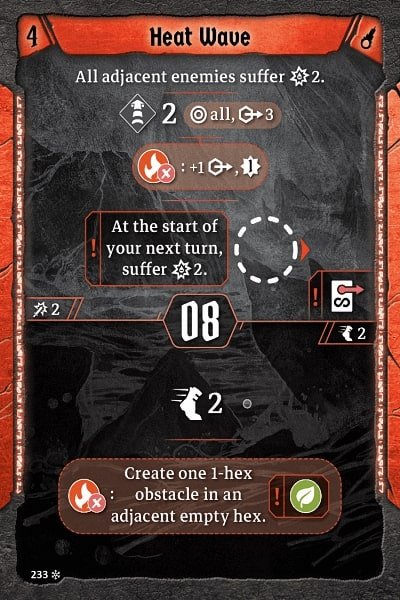
Heat Wave is our fastest card, period. With an insanely fast initiative of 8.
That super fast initiative is great. Because the top half of this card is useful for getting out of tight situations. All adjacent enemies suffer 2 damage. Again, direct damage. So it bypasses shield. Then any enemy within 3 hexes of you gets pushed for 2. And you can consume a fire to extend that range by 1.
At the start of your next turn, you’ll also suffer 2 damage. But if you find yourself surrounded and about to get pummeled. This can be a great way to push everything away from you.
The bottom half is a move of 2. But if you consume a fire, you get to generate and obstacle and a leaf element.
Lava Pyroclasts have an interesting choice here. Hand of Flame gives you access to a nice, big hit and another way to generate hazardous terrain. Heat Wave, however, gives you a great way to push lots of enemies through all of that hazardous terrain you’ve been creating. I think an argument could be made for either card. But for the purposes of this guide, we’re going to go with Hand of Flame. More ways to generate terrain is usually the safer choice.
We’re going to give up Metamorphic Rock for this one. It’s been useful to have this in our back pocket, thus far. But if you’re going with a Lava build, you don’t want to be up in enemies faces enough to make this card worth it.
Rock Pyroclasts will definitely want to take Heat Wave. The top half is great for this tankier build and the bottom half gives you another terrain generation option.
We’ll give up Flowing Fire to include this card in our hand. We’re losing our nice big move of 6. But the top half is becoming less and less useful to us, and there are better options ahead.
Level 5
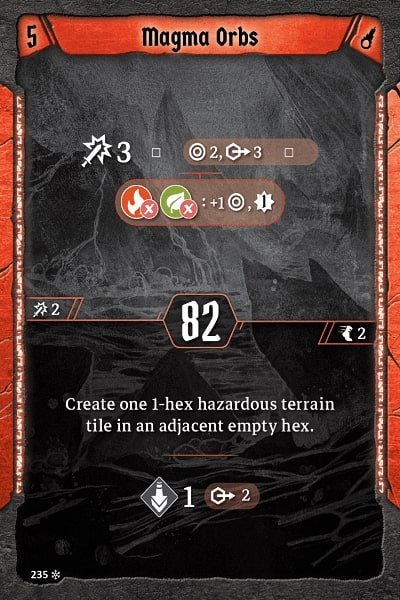
Magma Orbs is a slow card with initiative of 82.
The top half grants you an attack of 3 with two targets within range of 3. You may consume a fire and a leaf to increase that to three targets and gain an xp.
The bottom half lets you create hazardous terrain in an adjacent tile then immediately pull an enemy at range of 2 into it.
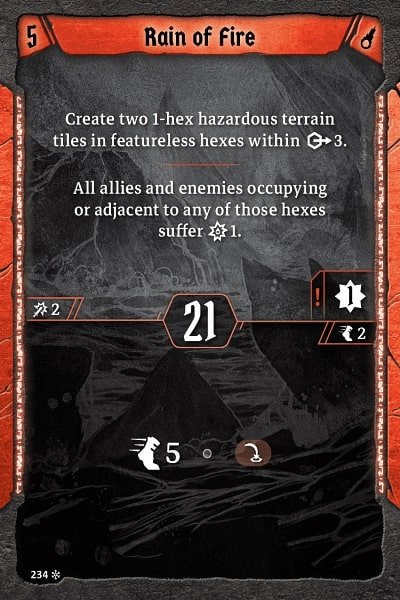
Rain of Fire is a great terrain generator with a nice speedy initiative of 21.
The top half lets you create two hazardous terrain tiles anywhere within range of 3. Then, anyone adjacent to or occupying one of those spaces suffers 1 damage and you gain an xp. This is another one that can hurt your party or yourself. So be careful with it.
The bottom half gives you an incredible move 5 with a jump. And this time, there are no trade offs for the big move.
Lava Pyroclasts are going to want to take Rain of Fire. It’s a great way to get more hazardous terrain out and deal some direct damage to a lot of enemies while your at it.
We’re going to replace Lava Bomb with this. As it’s just a better overall way to generate terrain.
Rock Pyroclasts will want to take Magma Orbs. It’s a great companion for a character that will routinely be surrounded by enemies. The top half lets you deal damage and reposition enemies. While the bottom half lets you bring an enemy in close for one of your hard hitting melee attacks.
We’re going to give up Force of the Earth for this. As we now have another pull at our disposal, and Force of the Earth is about to be outclassed by an upcoming card.
Level 6
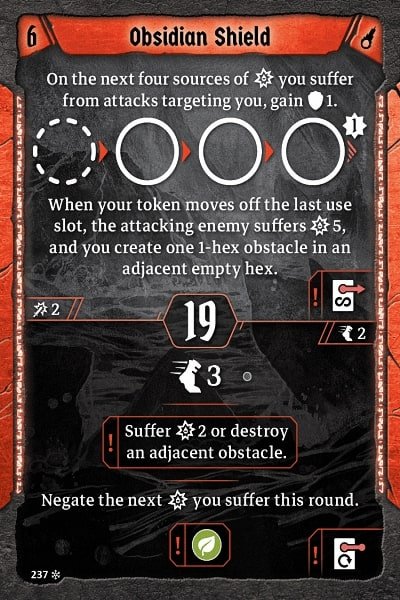
Speaking of cards getting outclassed. We have Obsidian Shield coming in with an initiative of 19.
The top half grants you a shield of 1 on the next 4 sources of damage to you.
Plus, when the token moves off the last use slot on the card, you gain an xp, create an obstacle in an adjacent hex and deal 5 damage to the enemy that just attacked you.
The bottom half gives you a move of 3.
You then suffer 2 damage. Or you may destroy an obstacle to negate that damage.
Finally, you completely negate the next source of damage to you this round
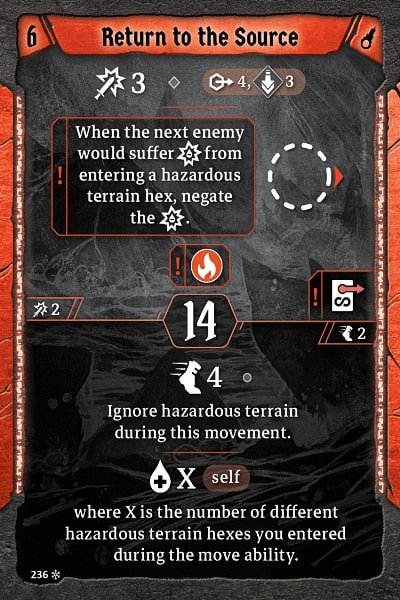
Return to the Source comes in with a blistering fast initiative of 14.
The top half is a 3 damage attack at range 4, with a pull of 3. You also generate a fire.
The trade-off is that the next enemy entering hazardous terrain will suffer no damage from it.
Things get interesting in the bottom half.
You get a move of 4 that lets you ignore hazardous terrain damage during the movement. Hopefully, you have the perk that already lets you do this with your own terrain by now. But this can definitely be useful for terrain that comes in the scenario.
Then you get to heal yourself for a number equal to the number of hazardous terrain tiles you just walked over.
Lava Pyroclasts should absolutely take Return to the Source. Getting access to a pull, in addition to all of your pushes, can help you drag a lot of enemies over the coals. Literally. Plus the bottom half of the card gives you access to another great heal.
We’re going to drop Liquid Stone for this one. We’re getting a pull commensurate with the push from that card, plus a bottom move and heal is just better than move and push.
Rock Pyroclasts will definitely want to take Obsidian Shield. Your build should really be coming into its own at this point. Obsidian shield gives you more ways to mitigate damage and both generate obstacles with the top and consume them with the bottom. This is a no-brainer for this build.
To take it we’re going to give up Metamorphic Rock. Obsidian shield provides many of the same benefits. It just does it better.
Level 7
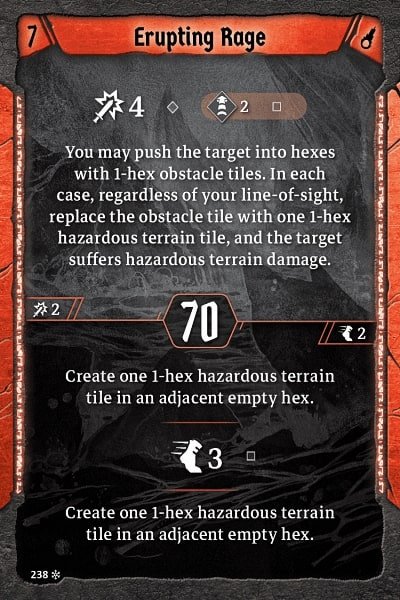
Our first level 7 card is pretty slow with an initiative of 70.
The top half of Erupting Rage gives you an attack of 4 with a push of 2. But, importantly, it lets you push an enemy through obstacles, dealing hazardous terrain damage to them as you go. Then you replace those obstacles with hazardous terrain.
The bottom lets you both move for 3 and create hazardous terrain tiles in hexes adjacent to where you both started and ended your move.
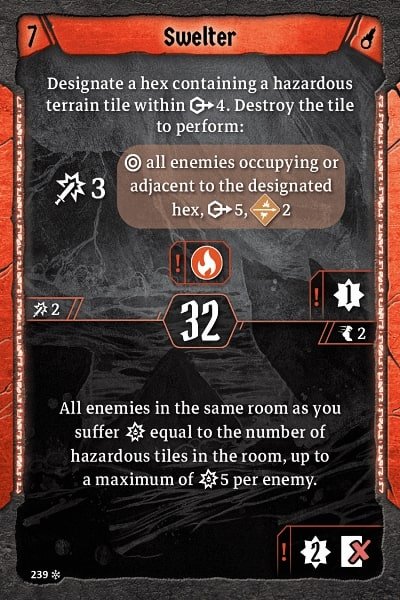
Swelter is a pretty spectacular card.
The top half lets you designate an existing hazardous terrain tile at range 4 and explode it. The result is that you get to perform an attack of 3 on any enemy occupying or adjacent to the hex that just exploded. The rest of the text here is confusing. Thanks to the range 5 listed as part of this attack. Big thanks go the r/Gloomhaven community for helping me figure this out. This is to effectively designate this as a ranged attack. But it doesn’t really matter. Because the only enemies you can target are enemies either occupying or adjacent to the exploding hex. The important part here is that you also get a pierce of 2. You then generate a fire and gain an xp.
The bottom half is even more nuts.
All enemies in the same room as you suffer damage equal to the number of hazardous tiles in the room. Up to a maximum of 5. And once again, this is direct damage. So it bypasses shields. It’s a burner. But in the right situation, this could be a devastating attack.
Lava Pyroclasts should take Swelter. Do I even need to explain why? This card is just that good, and it synergizes beautifully with the way you’ve built your character thus far.
We’re going to drop Flowing Fire for this. It’s been a great card to have in our pocket. But it’s just getting passed by, at this point.
This time Rock Pyroclasts have an interesting decision to make. Erupting Rage is a good card. And it synergizes nicely with their build. So they would be perfectly justified in taking it. However, Swelter is just too good to pass up without at least considering it. It doesn’t fit in with the Rock build as well. But it’s so great that might not even matter. You can’t go wrong, whatever your decision.
Regardless of your choice, you’re going to give up Cloud of Ash for this one. Again, the level 1 cards are just starting to get outclassed.
Level 8
Let’s start with the card I’m going to tell you not to take.
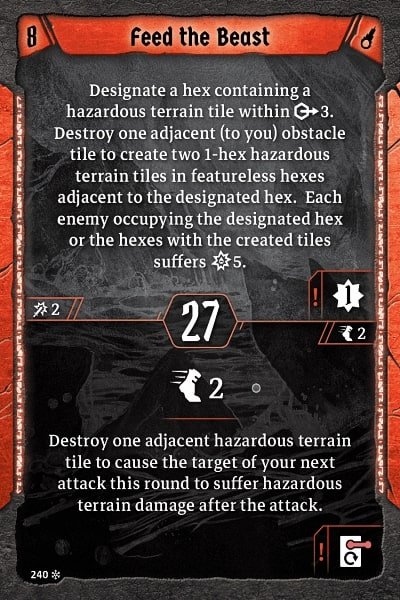
Feed the Beast has a decent initiative of 27.
The top half of the card has a lot of text on it. Which should be an indication that this one is a bit difficult to set up. It boils down to this. You have to be next to an obstacle that you can destroy. Then you need to have a hazardous terrain tile within range 3 of you, that also has enemies occupying or adjacent to it. You’ll destroy the obstacle then add two more hazardous terrain tiles next to the one you targeted with this attack. Enemies occupying the tile that you targeted or in one of the adjacent tiles where you added hazardous terrain will each suffer 5 damage. It’s potentially a bit git. But the odds that you’ll be able to set up everything perfectly to maximize the damage output here are pretty slim. You do get an xp for it, though.
The bottom half gives you a move of 2. Then you can destroy a hazardous terrain tile to add its damage to your next attack.
Here’s your huckleberry.
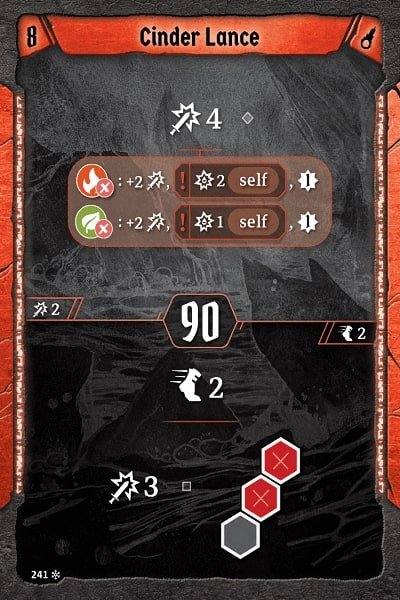
Cinder Lance comes in with an initiative of 90. Very slow, yes. But remember, the most useful initiative numbers are either very low or very high. So that you can guarantee your place in the initiative. Either the beginning or the end.
The top half is an attack of 4. But you can consume fire to add another +2 attack, suffer 2 damage and gain an xp. You can also consume a leaf to add another +2 attack, suffer 1 damage and gain an xp. If you consume both elements, you can boost this up to a base attack of 8. Which is insane!
But wait! There’s more. If you queue this up so that it’s the fourth attack after you’ve played Quenched Rage, you get to double it. That’s right. We’re talking about a base attack of 16!
Now let’s look at the bottom. A move of 2 with an attack of 3 targeting two enemies in a straight line. A move AND attack on the bottom of a card.
Lava Pyroclast or Rock Pyroclast, it doesn’t matter. Take Cinder Lance. It’s just a superior card in every way. The Lava Pyroclast is going to give up Melted Armor to take this and the Rock Pyroclast is going to give up Eruption.
Level 9
Here we are. The pinnacle. Level 9 cards.
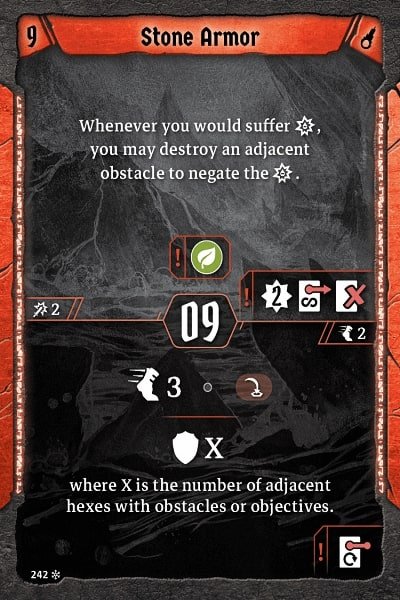
Let’s look at Stone Armor first. It’s our second fastest card with an initiative of 9.
The top half is an ongoing buff that lets you negate damage by destroying adjacent obstacles. It also generates a leaf and gets you 2 xp.
The bottom half is a move of 3 with a jump. Plus you get a shield equal to the number of obstacles or objectives next to you when you stop.
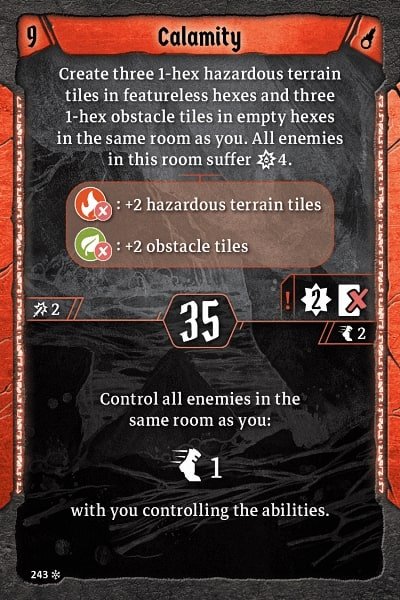
Calamity has an initiative of 35, and is our best terrain generating card, hands-down.
The top half lets you create 3 hazardous terrain tiles and 3 obstacle tiles in the same room as yourself. Then all enemies in that room suffer 4 direct damage. Plus you can consume fire to add 2 more hazardous terrain tiles and consume leaf to add 2 more obstacles.
It’s a burner. But in short you can absolutely FILL a room with this. Plus you get 2 xp.
The bottom half is also nuts.
You get to move every enemy in the same room as you for 1. With you controlling where they move. Meaning you can move enemies into hazardous terrain. Or move them in or out of range for upcoming attacks. It’s an incredible control ability.
Lava Pyroclasts should absolutely take Calamity. And give up Igneous Path for it. You only need one burner terrain generating card, and this is it. Without question.
Stone Pyrclasts may be tempted by Calamity. It’s a great terrain generator for them too. But for the Stone build to be all that it can be, you really want Stone Armor. The ongoing buff that allows you to negate damage by destroying obstacles is what makes this build shine. And since your built to tank damage, not deal it, you’ll want to give up Quenched Rage for this.
There you have it. A levelling guide for the unlockable Pyroclast class in Frosthaven. I hope this guide is helpful. Especially for people who may have just unlocked the Comet class and are trying to wrap their head around it. I truly think this is one of the strongest classes in Frosthaven, and it’s a blast to play.