Boneshaper Class Overview

The Boneshaper is a summoner and support class. They’re actually a very versatile class that can fit a lot of different roles depending on what your party needs. This may seem counter-intuitive, as the class seems like a typical low-health, magic-focused character. However, due to the number and versatility of their summons, they’re actually decent at either dealing damage or absorbing it.
The primary thing that sets this class apart is that it has access to several non-loss summon abilities. Most summon cards are lost upon the death of the summoned creature. Not so with the Boneshaper’s skeletons. Instead, when they are either killed or dismissed, they go into the player’s discard pile. This makes the Boneshaper unique in that they can keep firing off skeletons until they, themselves, are exhausted.
The drawback here is that, of course, the skeletons are fairly squishy. They can’t take a lot of punishment. This leads players to undervalue and misunderstand the class.
The truth is, even if you summon a skeleton and it immediately dies to an enemy attack that was still a valuable turn. Particularly because, as we’ve established, that skeleton card is then going to go into your discard pile. So, effectively, what you’ve done is apply a disarm to the enemy that killed your skeleton. That means, even at level 1, your skeletons can serve as ad-hoc tanks for your party.
I’m playing in a party with a Deathwalker and a Blinkblade. None of us are well equipped to absorb a lot of damage. So my summons tend to be on the front line a lot. That means they get damaged or killed a lot. But as long as their preventing me or my other party members from taking damage, then they’re doing their jobs.
If course, the thing you have to keep in mind is that each skeleton is going to cost you two health. There are ways to mitigate this. But you have a very shallow health pool, and limited options for healing yourself. So it’s imperative that you manage every precious HP that you have and make every summon count.
Let’s take a look at your level 1 cards…

Let’s start off with your bread-and-butter. As skeleton summon card. The top half of Damned Horde does just that. You summon a 3 health, 2 movement and 2 damage skeleton, at the cost of 2 damage to yourself. As I mentioned before, you have to keep an eye on this. As all of your level 1 skeleton summons are going to cost you some health. There are ways to mitigate this which we’ll discuss later. But it’s important to keep in mind.
It's also important to remember that summons don’t get to act on the same turn that their summoned. That means the high initiative here is actually a blessing. It means you’ll most likely get to go after the enemies have already taken their turn. Making it much less likely that you’ll immediately lose the skeleton to enemy attacks.
The bottom half of this card is decidedly mediocre. Putting out two curses is great. But the range of two kills its utility. If you’re Boneshaper is two hexes away from two different enemies, things have already gone wrong.

Our next skeleton summoning card is Life in Death.
Not much point in talking about the top half. It works the same as the other skeleton summons. It’s got the slowest initiative, though. Making it the best choice for when you want to move up and summon after the enemies have all moved.
The bottom half is interesting. It’s a loss. So you want to be careful with it. But given that it prevents the next three sources of damage to you, it can be a viable way to summon skeletons without suffering the two damage they usually inflict. How useful this is, really is going to depend on the situation. But I will say, you’re going to get access to cards at later levels that will make this bottom half even more tempting and interesting.
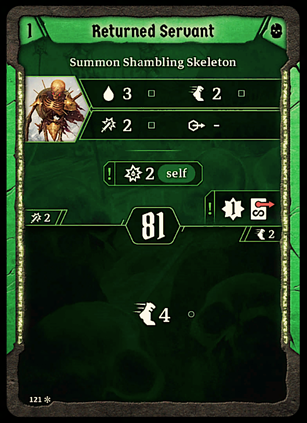
Returned Servant is our final skeleton summon card.
Again, not much to go into here. As it works the same as the others.
Except you get a nice move 4, bottom action with this one.

If your skeletons are the bread and butter of this class, Angry Spirits is the main course. This card is a must-have. The top half gives us a great summon. Unlike your skeletons, it’s lost upon death. But also unlike your skeletons, it comes with 2 persistent shield. It flies, and it’s attack has a range of 3. All of this means that your wraith is much more likely than your skeletons to both stay alive and have an enemy in range every turn. One damage isn’t a lot. But having one of these out pinging enemies every turn can add up.
The bottom half lets your summons deal some damage when they die. Obviously, this is a lot more situational. In fact, it’s pretty easy to determine which half of this card to use. Do the enemies you’re facing have shields? If so, use the bottom half. It’s great against shielded enemies, and the wraith is terrible against them. If they don’t have a shield, go with the wraith. Simple as that.
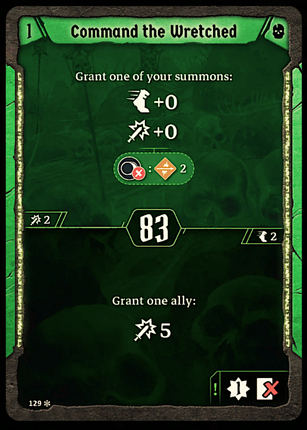
Command the Wretched is another great card. It should be a staple of any early build.
The top half grants one of your summons another movement and attack. The extra attack is obviously valuable. But as we’ve mentioned before, your summons are all pretty slow. So giving them another base movement is incredibly useful. Plus, you can consume a dark element, if available, to give this attack 2 pierce. Very situational. But another great way to deal with shielded enemies.
The bottom half is a pretty huge hit at level one. But it’s a loss. So you want to save it for a boss, or the end of the scenario. Which is fine. Because the top half of this card is so useful, I’ll happily use it repeatedly while I wait for the right opportunity to burn the bottom half. It’s come in clutch several times in our campaign so far.

Dark Tidings is a solid card. Primarily because of the bottom half. A move of 4 is just incredibly useful.
The top half is more interesting and situational. An extra attack for three of your summons can be a game-changer. But it’s a burner. So you definitely want to wait until you have three summons out and it position. Add to that the potential for three curses and poison if you consume a dark element and this can be a big swing.

Decaying will is our next must-have card.
The top half isn’t a huge hit. But it does have a huge range of five. And poison is always a great strategy for the Boneshaper, as it lets you eke some more damage out of your minions. Speaking of your minions, you get an extra damage if the target is next to one of them, plus you get to put a leaf on the board. Something that will come in handy on some of our other cards.
But as useful as the top half is, the bottom half is a god-send. All of your summons are immune to retaliate! Retaliate is the bane of any summoners existence. Our minions are squishy and not terribly intelligent. So it’s very easy to watch them kill themselves attacking targets with retaliate. But with Decaying Will, that’s no longer a problem! It slices! It dices! But it doesn’t slice and dice your minions!

And we finally get to our loot card. Looting is more important than ever in Frosthaven. So this is a must take card, simply because it’s you’re best and only option for getting loot. Aside form end of turn looting. Helpfully, it actually lets one of your summons loot. Which is useful, since they’re much more likely to be surrounded by dead enemies than you are.
Fortunately, the top half is no slouch either. Another huge range five ability. This time, with a curse. And again you get a bonus if one of your summons is adjacent to the target. That summon gets a free attack. Plus you put a dark element on the board. Something which, as we’ve already seen, we can make good use of.

Fell Remedy is my main healing card.
The top half is a heal 2 on any ally within range 3. But it can be boosted by consuming either leaf, darkness or both. Two elements which we can reliably generate. And importantly, it’s got a relatively snappy initiative of 30. Giving you a decent chance to get this off before enemies deal any more damage. As I’m playing in a party without a dedicated tank, I’ve used this card a lot.
The bottom half is one of your relatively few options for a self heal. Very important, as your skeleton summons can eat through your HP. It’s s pretty small heal, though. So you wan to try and maximize it by making sure an enemy dies on the round you use it.
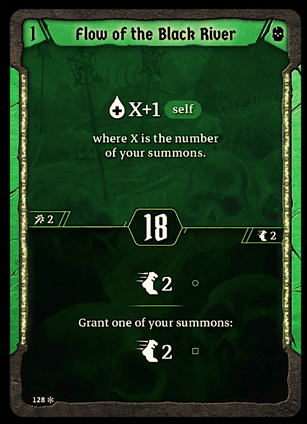
Flow of the Black River is your best initiative card at level one. And will remain your best initiative card for some time. Given that, it’s worth taking for that reason alone.
The top half is your other self-heal, and a much more reliable way to get a bigger heal than Fell Remedy. Because the bonus here is based on how many summons you have out.
The bottom half is great because it not only lets you move. But it grants a free movement to one of your summons too. This pairs great with one of your attack granting top halves. Moving a summon up and granting them a hit, likely before any enemy moves, is a great turn.
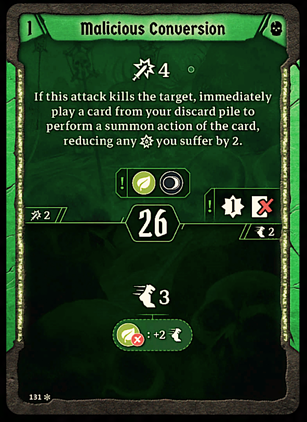
Malicious Conversion is great when you need to get up and running quickly. It’s got a nice, speedy initiative of 26. Which makes it our third fastest card.
The top card is a burner. But it provides a substantial 4 damage hit AND you can pull a skeleton out of your discard pile and summon it without taking the typical 2 damage. Plus you put both of your most-used elements on the board.
A turn that takes advantage of this, might look something like this:
Use the bottom half of Returned Servant to move up 4 hexes and get next to an enemy. Then use the top half of Life in Death to summon a skeleton. On your next turn play Malicious Conversion with it’s relatively fast initiative, to hopefully go before the enemies. Hit your target and pull Returned Servant out of your discard pile. Now you’ve got two skeletons on the board and you’ve dealt some damage.
The bottom half is a solid movement of 3. But we have some pretty reliable ways to put leaf on the board. So there’s a decent chance you can boost this up to an impressive 5 move.
Transfer of Essence is an excellent tool to have in your belt. It has a bit of a lousy initiative at 62. Making it something of a crapshoot as to when you’ll go in the initiative order.
But the top action is solid. You’re almost always going to have a target for both strengthen and poison. Especially given all of your summons. Plus, you have several reliable ways to generate dark and leaf. This is a great way to consume them when you don’t have a better option available.
The bottom is a really nice heal for your party members or your summons. The drawback, of course, is the self-damage. As we’ve already discussed, you don’t have a huge health pool and your self-healing options are limited. So there’s usually a better use for your precious HP.

Wrath of the Turned Earth fits a very specific niche.
The top half is a decent attack granting ability for one of your summons, with added poison if you consume a leaf. However, in most cases, Eternal Torment is going to be a better version of this ability. Curse is more useful than poison and you typically want enemies poisoned BEFORE your summon gets to them.
The bottom half seems tempting, as it prevents damage to your summons. But, honestly, you shouldn’t be too precious about your skeletons survival anyway.
Now where this card shines is if you end up going with a single, powerful, summon build. In that case, granting an extra attacks to that one summon or preventing damage to it becomes a lot more attractive. But that’s not an option that becomes viable until you’ve gained some levels.

Ah Exploding Corpse. If I had any doubt that Diablo 2’s Necromancer was an inspiration for this class, it was gone after seeing this card.
Again, this one’s very situational. As all X cards should be. If you manage to surround one of your summons with enemies AND they survive long enough for you to pull this off, the top half can deal a huge amount of damage. But those are some pretty big ifs. Especially at level 1. And it’s a burner. So you want to make sure you maximize the potential damage output.
It’s got a nice, low initiative, though. And the bottom half well, also an exploding corpse. The next enemy to die this round deals 2 damage to any ally or enemy adjacent to them when they die. Again, potentially useful. But very situational.

Approach Oblivion is our first X card. And like most X cards its usefulness is more situational.
The top half is the kind of ability that can turn a game around in the right situation. 4 healing and a bless to all allies, which includes both your summons and party members is huge. Of course, the range of 2 makes it a bit more limited. You’re also going to deal 2 damage to yourself and curse yourself. The self-curse isn’t great. But the 2 damage is a bigger deal here. As your HP is better spent summoning skeletons. Plus this is a loss. So you don’t want to use it unless you really, really need it.
The bottom half is arguably more useful. Most of your summons are pretty slow. So having another way to catch them up can come in clutch.