Frosthaven Geminate Class Overview

At GenCon, this year, Wendy and I got the chance to play an early scenario for Frosthaven. It was a lot of fun and got us even more excited to receive the final game in a month or two. They even let us keep the player decks we were using, afterward. I think this was both a COVID precaution, and nice treat for anyone who signed up to play.
But since I got to keep my starter deck, I thought I would talk about my experience playing as the Geminate and go through each of the starting cards for that class. I’ll be adding each of the cars to the blog here, as I go through them.
Right off the bat, the facilitator warned me that the Geminate was one of the most complex of the starting classes. I quickly learned why. The Geminate can switch back and forth between a melee form and a ranged form. In fact, rather than a single deck, it actually has two decks of 7 cards each. One for the melee form and one for the ranged form.
How do you switch back and forth? Well, any card ability that displays this symbol () requires you to switch forms after you use that ability.
The real challenge here is keeping track of how many cards you have left in each deck. Because You must either be able to rest or play two cards from your current form at the start of each round, otherwise you become exhausted.
That means you always want to hold one of those form switching cards in reserve. So that you don’t get stuck with only one or two cards in your hand, and no way to switch back to the other form. It’s an interesting balancing act that takes some getting used to.

One complaint I had was the iconography for the different forms. Honestly, the symbols just look a bit like ears to me. Even by the end of the scenario, it was hard to remember which one was melee and which was ranged.
Overall, I wouldn’t recommend the class for a beginner. But if you’re willing to push past the learning curve, I can definitely see how you could pull off some fun, powerful combos with it.
Let’s get to the cards!

We’re starting off strong here with Scarab Flight. A decent initiative at 30. With an extremely useful top-half attack that can hit up to three enemies in a straight line with an added push-back effect for extra utility.
We also get our first look at the new “precise range” requirement added to Frosthaven. The attack must be ranged, as it can only target enemies that are 3 to 4 spaces away from your character.
The one drawback here is that to maximize this ability, you need three enemies to line up in a nice straight line for you. But if you’re making effective use of choke-points, this is doable.
The bottom half is no slouch either.
It gives you shield against the next four sources of damage targeting you. One if you’re in ranged form and 2 if you’re in melee form.
It’s a nice buff. But it should be used strategically. As, ultimately, it’s a burner card. Once you’ve been shielded against damage for the fourth time, you lose the card. And as I mentioned before, you have to be very careful about your burner cards with this class. Or you could easily end up exhausting yourself.

Next up, we’ve got Selfless Offering.
The top-half here lets you heal an ally at exactly three spaces away from you, for three damage.
You can also give that ally regeneration, if there’s a fire element on the board for you to consume. You’ll also get a bonus XP if you do this.
Again, decent initiative at 27 means that you’ll likely be able to get this heal off when you need to. Before your enemies attack.
On the bottom half, you’ve got a very solid movement of 3. But much more importantly, this is our first form change ability. So you’ll want to be very strategic about when you pull this one out.

Firefly Swarm gives you a very powerful attack on the top-half of the card. But it’s got several drawbacks.
First off, with an initiative of 76, you’re practically guaranteed to be going after everyone else. Including the enemies.
Plus it’s a burner. And as we’ve discussed, you can’t afford to burn many cards with this class.
On the positive side, it packs a hell of a punch. 3 damage. Plus it’s an AoE that can hit up to three different enemies at three to four spaces away. On top of that, you can boost it up to 4 damage if you’ve got a fire element to consume.
It’s the kind of big swing that can really turn a fight around if used at the right time. But you better make sure you’re making the most out of it, if you’re going to burn a card for it.
The bottom half is a straightforward, if impressive, 4 movement. Again, just make sure you’re prepared to go at the end of the initiative.

Mind Spike is a great, low initiative card at 18.
The top half is a burner. But the utility and damage it offers, might make it worth the cost.
You can hit three targets at four to five spaces away from you and pin them. In addition, you’ll do one damage to every enemy you pin. Plus, you can consume a Light element to gain one extra damage and experience point.
This ability came in clutch during the test scenario we were running. I hated to burn the card. But it was worth it to pin a clump of enemies in place as they squeezed through a door. It likely saved the lives of at least two other party members.
The bottom half is also extremely useful.
Two damage to an enemy three to four spaces away and a form shift.
With the card’s low initiative, this is a great way to get in a hit and shift into melee form before the enemies can move.

Into My Embrace gives you another excellent form shift option.
The 36 initiative is solid and puts you in a good position to act before most enemies.
The top-half of the card lets you deal three damage to an enemy either three or four spaces away from you. Importantly, it also lets you pull that enemy two spaces toward you. Setting you up nicely for your shift into melee form.
It does what it says on the tin.
The bottom half is a powerful get out of death free maneuver. With a self heal for four and a regenerate buff. Plus a strengthen and an XP if you’ve got a fire or light element to burn.
As usual, that power comes at a cost. As this is a burner move and you’ll lose the card after using it.
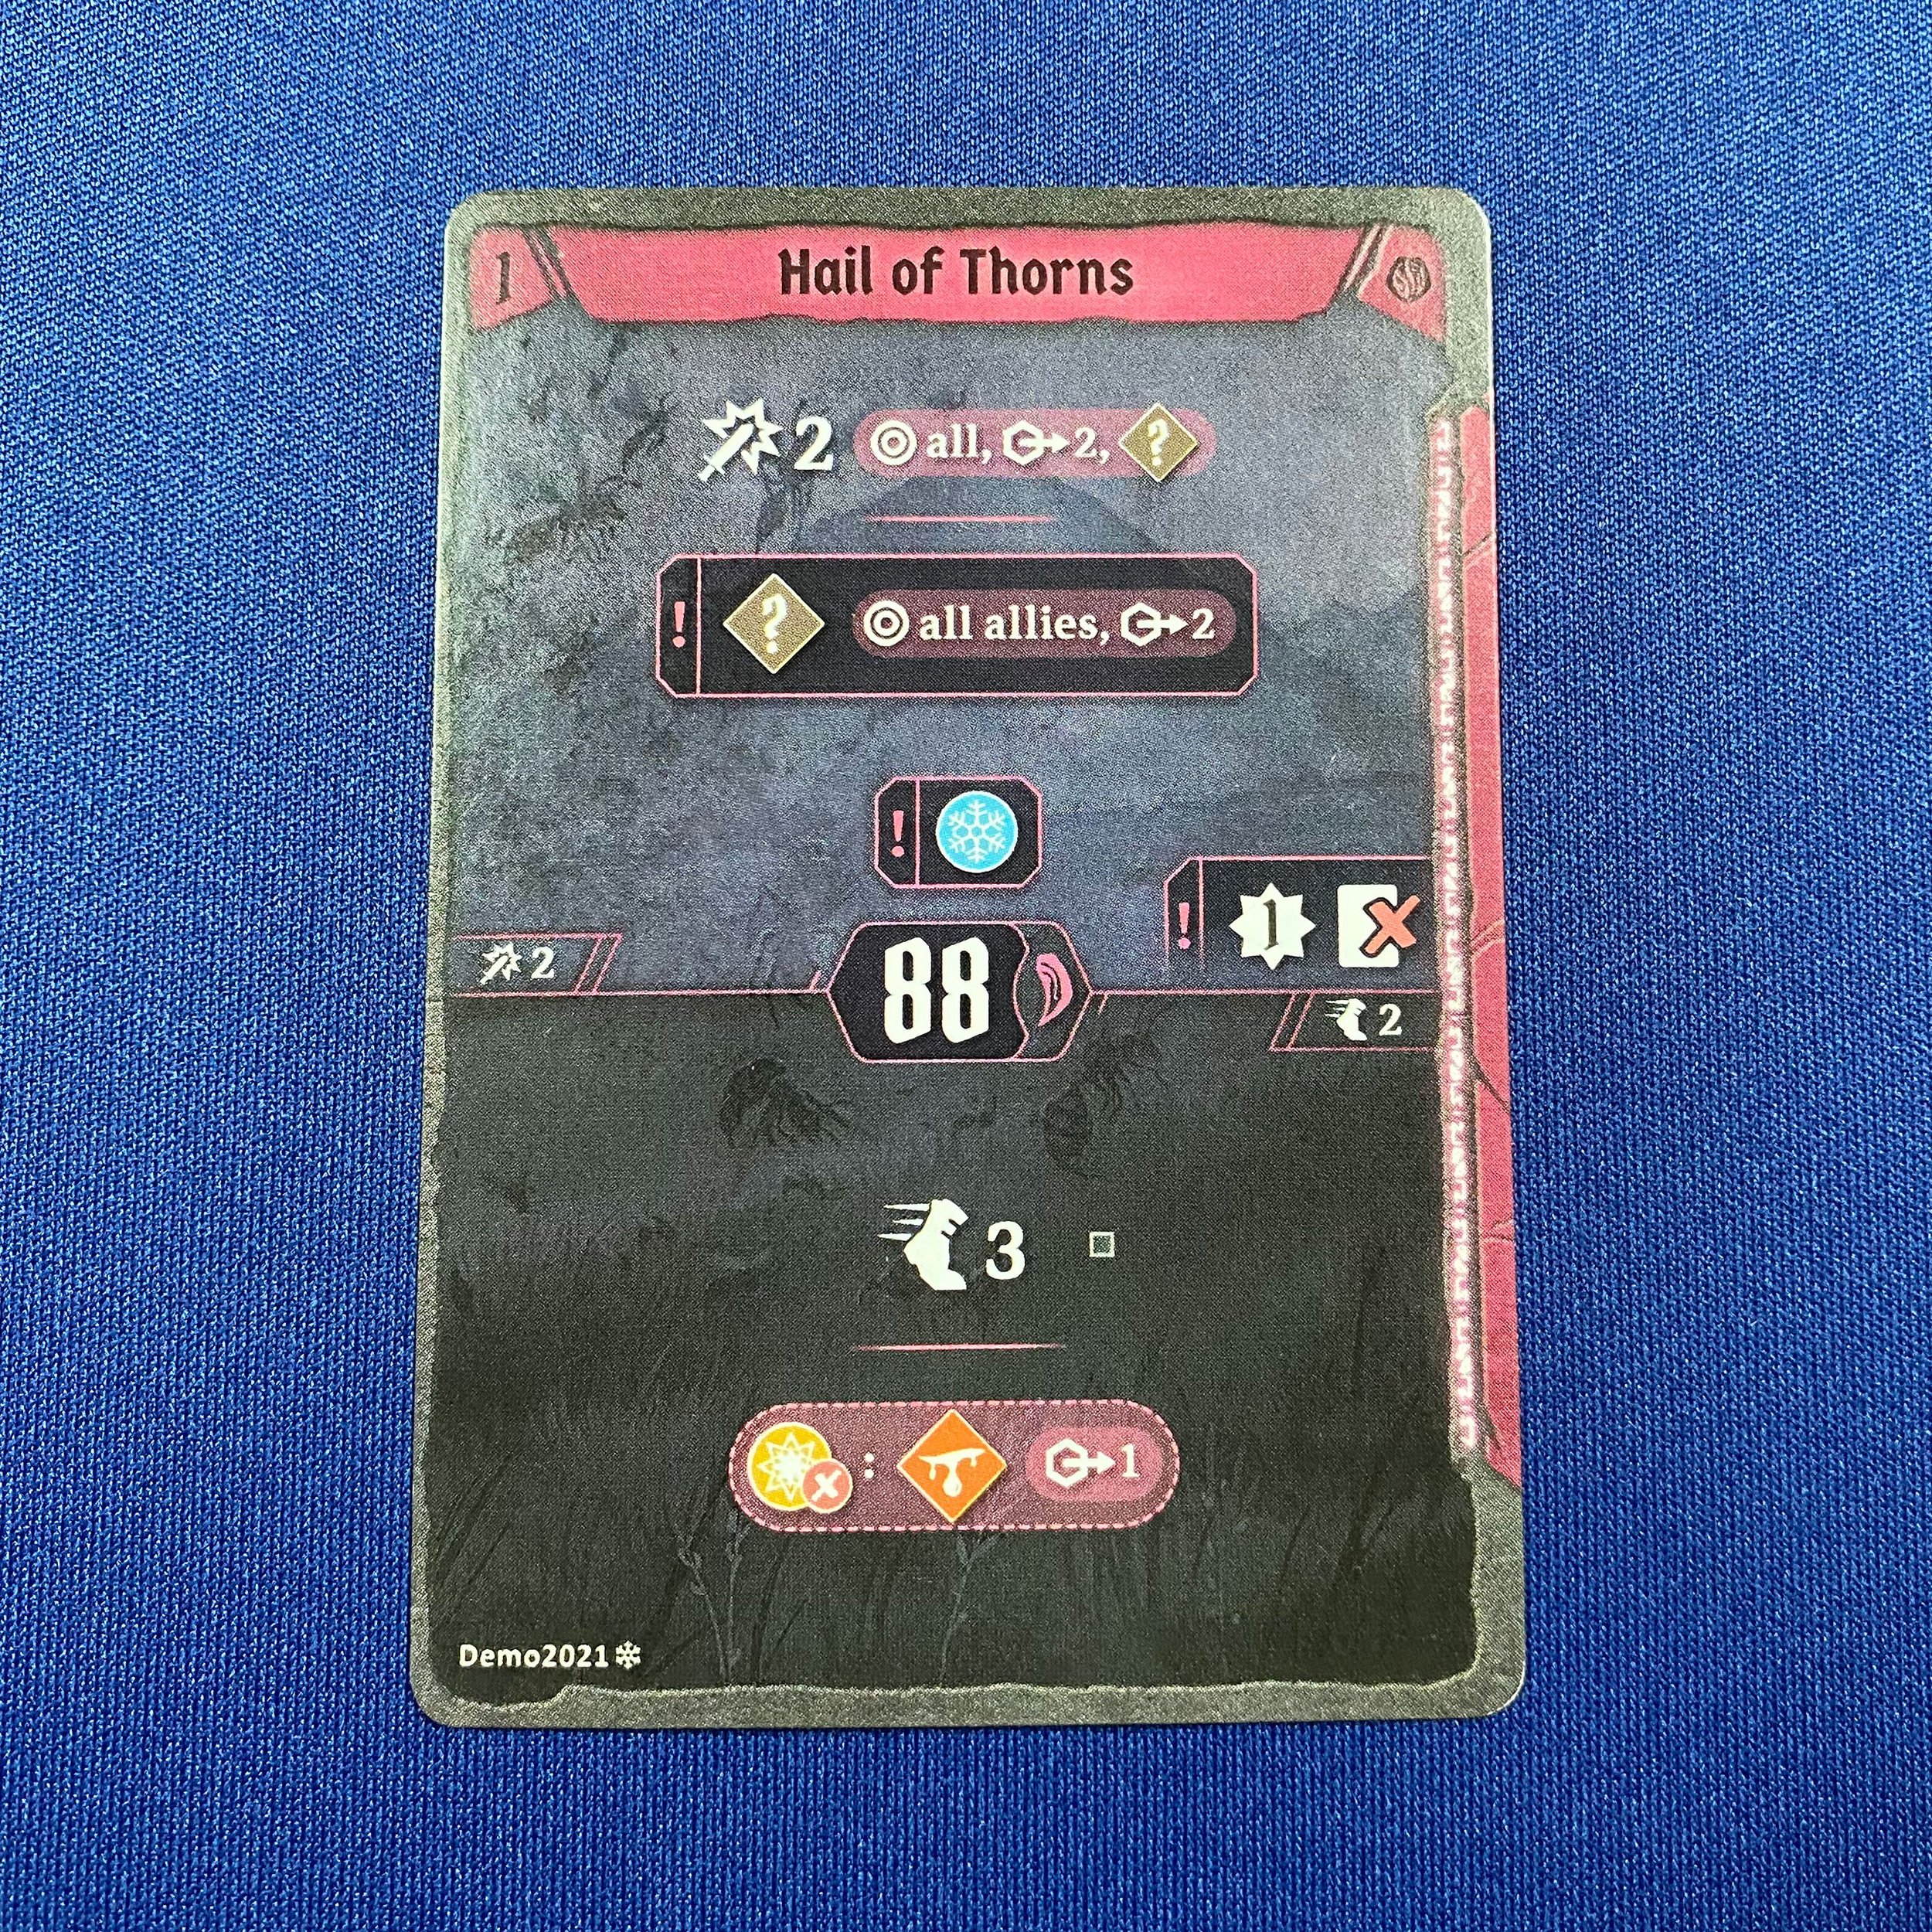
Hail of Thornes is our last ranged card for the Geminate.
It’s our slowest card, with an 88 intitiative.
The top half introduces a complication that we’re going to see come up often in the melee deck. Friendly fire.
This power targets anyone exactly two spaces away from you. It deals two damage to enemies and applies a confusion debuff. The confusion debuff applies to any allies two spaces away from you, as well.
It also puts an ice element on the board. Plus it’s a burner.
Dealing two damage to every enemy in play is powerful. But given all of the drawbacks here, you want to be very careful about how and when you deploy this one.
The bottom half is a great three movement, with the ability to consume a fire element and wound a target one space away from you.

Our first melee card is Flailing Tendrils.
Remember when I said that friendly fire would come up again on our melee cards? Well this card may as well be named Duck!
It’s super fast with a 12 initiative. All but guaranteeing that you’ll go first.
The top-half demonstrates the eponymous tendrils. Dealing one damage and applying confusion to any enemy caught in the Y shaped target pattern.
You can consume a light element to bring the damage up to two.
Unfortunately, any ally caught in one of the red target hexes is going to get hit with the confusion debuff as well.
The bottom half is, arguably, more extreme.
It lets you apply a wound to everyone. And I mean everyone. All allies and enemies get wounded. But only if they are exactly two spaces away from the player.
You’ll also put a fire element on the board.
The ability is a burner. Again, given all of the drawbacks here, this is probably a desperate move at best.

Hornet Stingers is another big area of effect attack. This time in a V pattern.
It’s got a pretty speedy 23 initiative.
It deals 1 damage to all enemies caught in the target hexes. But, importantly, it pierces three armor and applies poison. This is a great attack to use against armored foes.
But be careful. Because friendly fire is back. Any allies caught in a target hex will get poisoned.
It’s also a form change ability. So be sure you’re ready to switch into ranged form, before you attack.
The bottom half is also strong. With a movement of three. Plus all attackers gain disadvantage when attacking you, this round.

Draining Pincers, our next melee card, has another strong straight line attack with the potential to deal three damage to up-to three enemies.
But like Scarab Flight, they have to nicely line up for you.
You can consume a light element to gain advantage on your modifier deck and an extra XP.
Unfortunately, it’s a burner with a very slow initiative of 72.
The bottom half is more useful, with a movement of three that allows you to jump over enemies and obstacles.
It’s also a form change to ranged.

Icebound Quills packs a serious whollop.
With an incredibly fast 14 initiative and whopping five damage with one piercing.
Consume an ice element to add an extra damage, piercing and XP.
Unfortunately, it’s a burner. But if could be worth it if it lets you deal the killing blow to a tough target. This is most powerful single target attack that you have in your deck.
The bottom half grants you one shield and one strengthen for the round.

Drag Down offers our next form change.
It comes in with a very solid 36 initiative.
The top-half power lets you deal two damage and pin up to three enemies in a hook pattern.
The strategy here is to pin enemies in place before switching to ranged form. Then put some distance between yourself and the enemies to take full advantage of your ranged attacks.
The bottom half is a bit of a panic maneuver.
It lets you move up to four space, jumping over enemies and obstacles.
Plus you can disarm up to two enemies that are one space away from you.
It’s a burner. But if you’re in a situation where disarming enemies and putting as much distance between yourself and them as possible is your best bet, you’re likely in a desperate enough situation that burning a card is the least of your problems.

Changeling’s Boon is one of the more confusing cards in the deck.
The top half, ironically, is pretty straightforward. You get two attacks for two damage each. That’s it. Pretty simple.
A 40 initiative puts you squarely in the middle of the pack.
The bottom half is where things get interesting.
The basic power is straightforward enough. Add a bless card to your modifier deck. And at the end of your turn, you may convert any element on the board to fire or light.
Finally, you’ve got a form change. The form change is what confused me, at first.
As the card is an ongoing ability, I thought it might cause you to shift forms every turn, for free, until you discarded it. But according to our facilitator, that’s not how it works. The ongoing ability portion only applies to the element change. The form change only happens once, when the card is first played.
I don’t know if further updates to the design of this card were planned. But I believe this is an easy mistake for people to make. So I wanted to point it out.

Our final Geminate card is Hornbeetle Carapace.
20 initiative is nice and speedy.
The top-half lets you add damage to your next four attacks. Plus one if you’re in melee form and plus two if you’re in ranged form. You likely want to play this in combo with a form change. To take maximum advantage of the extra damage.
The card is burned after four attacks.
The bottom half is one movement with one shield. You can consume an ice element to add another shield and get a bonus XP. It’s a fairly straightforward, but reliable, defensive option. Especially coupled with the fast initiative.